Featured Posts
![]() John Guan - Jul 30, 2023
John Guan - Jul 30, 2023
We know the demand for personal cloud solutions has witnessed a significant surge. With the accumulation of digital content, including photos, videos, documents, and other files, people seek secure and convenient ways to store, access, and manage their data. Personal cloud solutions offer the perfect balance of privacy, accessibility, and control over one’s data, making them increasingly popular among individuals, small businesses, and even larger enterprises.
FreeNAS is an open-source, robust, and feature-rich network-attached storage (NAS) operating system. It provides a reliable solution for creating a centralized storage hub that can be accessed over the network. When paired with the ZimaBoard Single Board Computer (SBC), FreeNAS offers a cost-effective and efficient personal cloud setup. ZimaBoard, with its powerful hardware and compact design, complements FreeNAS perfectly, making it an ideal platform for building your personal cloud.
Part 1: What is FreeNAS and its advantages?
In the world of network-attached storage (NAS) solutions, FreeNAS stands out as a powerful and versatile open-source operating system. Developed on the FreeBSD platform, FreeNAS is designed to provide users with a centralized storage solution accessible over the network. With its robust features, data protection capabilities, and extensive file-sharing protocols, FreeNAS has gained immense popularity among individuals, small businesses, and enterprises alike.
One of the key advantages of FreeNAS is its open-source nature, which means the source code is freely available for modification and distribution. This fosters a community-driven development environment, ensuring continuous improvement and the incorporation of user feedback into future releases. The open-source nature of FreeNAS also allows users to customize and adapt the system to their specific needs, making it an ideal choice for various storage scenarios.
1. Highlighting the Key Features and Advantages of FreeNAS
Data Redundancy and Protection: One of the primary concerns for any storage system is data protection and integrity. FreeNAS offers various RAID (Redundant Array of Independent Disks) configurations, enabling users to create redundant storage arrays that can withstand the failure of individual drives. This ensures that even if a drive fails, the data remains accessible and intact.
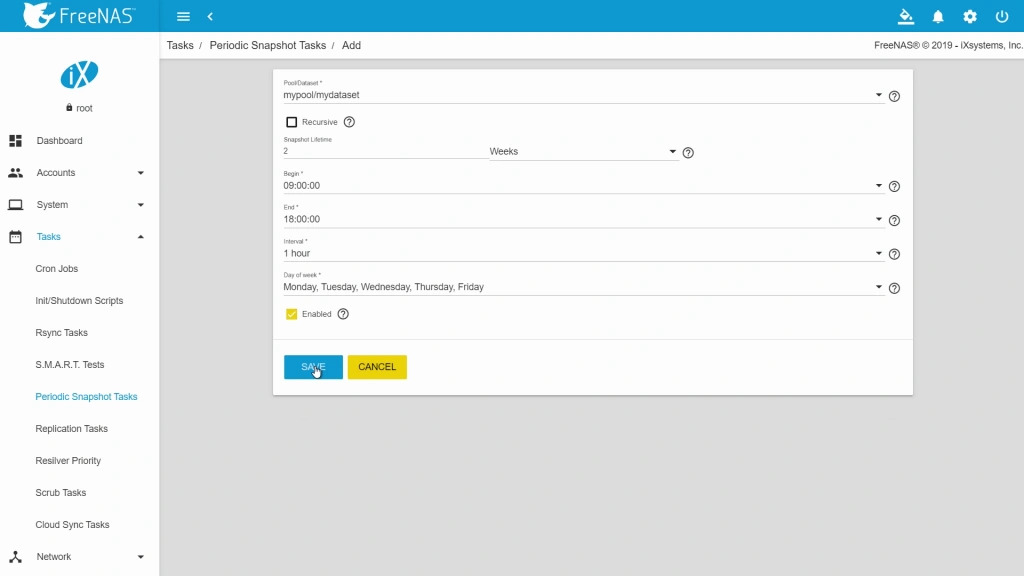
Data Snapshots: FreeNAS provides users with the ability to take periodic snapshots of their data. These snapshots are point-in-time copies of the entire dataset, enabling users to roll back to previous versions or recover deleted files. This feature proves invaluable in scenarios where data needs to be rolled back due to accidental changes or data corruption.
File Sharing Capabilities: FreeNAS supports multiple file-sharing protocols, such as SMB (Server Message Block), NFS (Network File System), AFP (Apple Filing Protocol), and iSCSI (Internet Small Computer System Interface). This enables seamless access to data across various devices and operating systems, making it easy to share files and collaborate within a networked environment.
Encryption and Security: FreeNAS incorporates various security features to protect data from unauthorized access. These include built-in support for encryption, ensuring that data remains encrypted both at rest and during transit. Additionally, FreeNAS allows users to implement robust access control lists (ACLs) and user authentication mechanisms to ensure that only authorized users can access specific data.
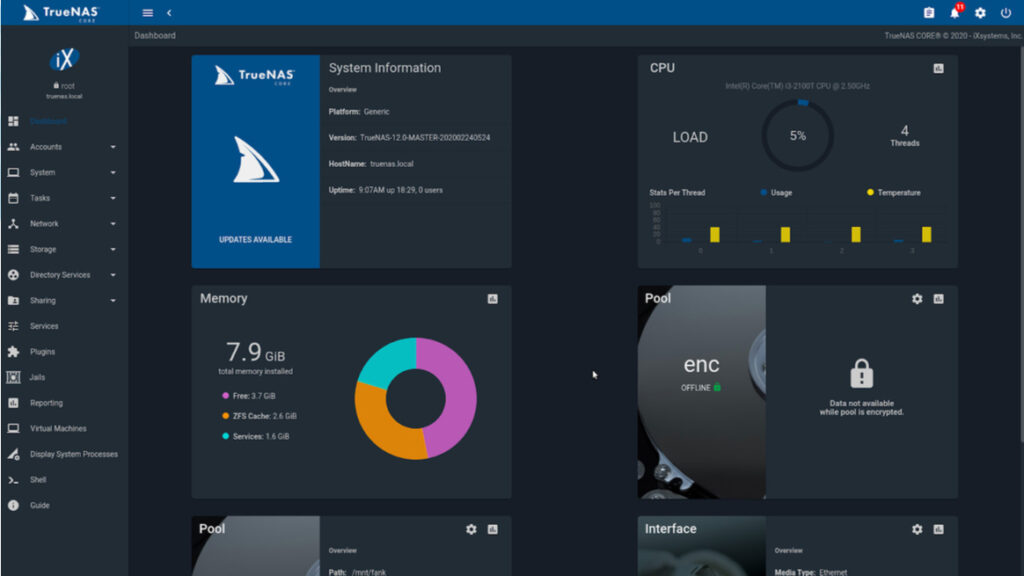
Web-Based Interface: FreeNAS provides a user-friendly web-based interface that allows users to manage and configure their storage system easily. This eliminates the need for complex command-line configurations, making it accessible even to users without extensive technical expertise.
2. Exploring ZimaBoard SBC’s Compatibility with FreeNAS
ZimaBoard SBC is a powerful and energy-efficient single-board computer that pairs seamlessly with FreeNAS to create an efficient and cost-effective storage solution. The small form factor of ZimaBoard makes it ideal for compact storage setups, and its low power consumption ensures minimal energy usage, making it an eco-friendly choice.

ZimaBoard’s hardware capabilities are well-suited for running FreeNAS effectively. It typically comes equipped with a compatible ARM or x86 processor, sufficient RAM, and multiple storage options, such as SATA connectors for SSDs or HDDs. These features make ZimaBoard an excellent platform for hosting FreeNAS, providing users with a reliable and efficient storage solution for their personal or business needs.
The compatibility between FreeNAS and ZimaBoard also ensures optimal performance and stability, allowing users to harness the full potential of FreeNAS’s advanced features. Whether you are looking to create a home media server, set up a backup solution, or manage your personal cloud, FreeNAS on ZimaBoard SBC offers a powerful and versatile combination.
Part 2: Step Guide on How to install FreeNAS?
1. Hardware Requirements for ZimaBoard SBC
Before diving into the installation process, it’s essential to ensure that your ZimaBoard single-board computer meets the necessary hardware requirements for running FreeNAS smoothly. Properly fulfilling these requirements will result in optimal performance and stability of your FreeNAS installation.
Processor: ZimaBoard typically comes equipped with an ARM or x86 processor. While FreeNAS can run on both types, it is recommended to use a processor with adequate processing power for better performance.
RAM: FreeNAS requires a minimum of 8GB of RAM to function effectively. However, for larger storage pools and more concurrent users, it is advisable to have at least 16GB of RAM.
Storage: ZimaBoard allows for various storage options, including SATA connectors for SSDs or HDDs. The total storage capacity you require will depend on your data storage needs and future scalability plans.
Network Interface: ZimaBoard should have a reliable network interface, preferably Gigabit Ethernet, to ensure fast data transfers and smooth network connectivity.

2. Choosing the Appropriate Storage Devices and Capacity
Selecting the right storage devices is crucial for building a robust and efficient FreeNAS setup on your ZimaBoard SBC. Here are some considerations when choosing storage devices:
SSD vs. HDD: Solid-state drives (SSDs) offer faster read and write speeds, making them suitable for applications that require quick data access. Hard disk drives (HDDs) are more cost-effective and ideal for large storage capacities.

Redundancy and RAID: If data redundancy and protection are a priority, consider setting up a RAID configuration with multiple drives. RAID options such as RAID 1 (mirroring) or RAID 5 (striping with parity) can safeguard your data against drive failures.
Capacity Planning: Assess your data storage needs and plan for future growth. Consider the types of data you will store, such as media files, documents, or backups, to estimate the required capacity.
3. Downloading the FreeNAS Installation Image
Before proceeding with the installation, you need to obtain the FreeNAS installation image. Here’s how to download it:
Open a web browser and navigate to the official FreeNAS website (https://www.freenas.org/).
Click on the “Download” tab in the top menu.
You will be presented with various options for downloading the FreeNAS installation image. Choose the appropriate version based on your ZimaBoard’s architecture (ARM or x86) and the version you want to install.
Once the download is complete, you will have a FreeNAS installation image file, typically in .iso format.
With the hardware requirements met and the FreeNAS installation image downloaded, you are now ready to install and configure FreeNAS on your ZimaBoard SBC. The next section will guide you through the step-by-step installation process, ensuring a successful and reliable FreeNAS setup. Let’s get started!
Part 3. How to Installing FreeNAS on ZimaBoard SBC?
1. Creating a Bootable USB Drive
The first step in installing FreeNAS on your ZimaBoard SBC is to create a bootable USB drive. This USB drive will contain the FreeNAS installation image, and it will serve as the installation medium for your ZimaBoard. Follow these steps to create a bootable USB drive:
Download Rufus: Rufus is a popular tool for creating bootable USB drives. You can download it from the official website (https://rufus.ie/).
Insert a USB flash drive: Connect a USB flash drive with at least 8GB of storage capacity to your computer. Ensure that you have backed up any important data on the drive, as the process will format it.
Run Rufus: Launch the Rufus application on your computer.
Select the FreeNAS ISO: In the Rufus interface, click on the “Select” button next to “Boot selection” and choose the FreeNAS installation image (.iso) you downloaded earlier.
Configure settings: Make sure the “Partition scheme” is set to “GPT,” and the “File system” is set to “FAT32.” You can leave the other settings at their default values.
Start the process: Click on the “Start” button in Rufus to begin creating the bootable USB drive. This process may take a few minutes.
Safely eject the USB drive: Once the process is complete, safely eject the USB drive from your computer.
2. Booting into FreeNAS Installation Wizard
With the bootable USB drive ready, it’s time to boot your ZimaBoard SBC from it and access the FreeNAS installation wizard. Follow these steps to boot into FreeNAS:

Insert the bootable USB drive: Connect the bootable USB drive to one of the USB ports on your ZimaBoard.
Power on the ZimaBoard: Turn on your ZimaBoard SBC and connect it to a monitor via HDMI. You should see the boot screen, and the ZimaBoard will automatically boot from the USB drive.
Access the FreeNAS installation wizard: After booting from the USB drive, the FreeNAS installation wizard will appear on the screen. Follow the on-screen instructions to proceed with the installation.
3. Step-by-Step Installation Guide and Best Practices
The FreeNAS installation wizard will guide you through the process of installing FreeNAS on your ZimaBoard SBC. Here is a step-by-step guide to help you with the installation:
Select the installation disk: The installation wizard will detect the available storage devices on your ZimaBoard. Choose the disk where you want to install FreeNAS. If you have multiple disks, you can set up RAID configurations for data redundancy and protection.
Set the root password: Choose a strong and secure root password for your FreeNAS system. This password will be used to access the administrative functions of FreeNAS.
Configure the network settings: Assign a static IP address to your FreeNAS server or set it to obtain an IP address automatically. Configure other network settings as needed.
Set up user accounts: Create user accounts with appropriate privileges for accessing FreeNAS shares and services.
Configure services: The installation wizard will prompt you to enable or disable various services offered by FreeNAS, such as SSH, FTP, and others. Choose the services that suit your requirements.
Review and finalize: Review your installation settings to ensure everything is correct. Once you are satisfied, proceed with the installation.
Reboot and log in: After the installation is complete, the ZimaBoard will automatically reboot. Log in with the root username and the password you set during the installation process.
Best Practices for FreeNAS Installation:
Keep the FreeNAS installation image updated: Check the FreeNAS website regularly for updates and security patches. Keeping your FreeNAS installation image up to date ensures that you have the latest features and security enhancements.
Backup your data: Regularly back up your data to an external storage device or a remote location. FreeNAS provides various backup options, including replication to other FreeNAS systems or cloud storage.
Monitor system performance: Use FreeNAS’s built-in monitoring tools to keep an eye on the system’s performance, disk usage, and network activity. Monitoring helps detect and address any performance issues promptly.
Secure remote access: If you need remote access to your FreeNAS system, set up a secure VPN connection or use FreeNAS’s built-in secure shell (SSH) service. Avoid exposing your FreeNAS system directly to the internet to prevent unauthorized access.
Conclusion:
Installing and configuring FreeNAS with ZimaBoard SBC provides you with a powerful and flexible personal cloud solution for storing and managing your data securely. By following the step-by-step installation guide and best practices, you can ensure a smooth and reliable FreeNAS setup, safeguarding your data and promoting responsible technology usage. Enjoy the benefits of FreeNAS on your ZimaBoard SBC and take control of your personal cloud storage.