Latest News
![]() John Guan - Feb 05, 2024
John Guan - Feb 05, 2024
Innovative Fusion: ZimaBoard and Unique Chassis for Low-Power NAS/Dev Server: An Interview with Tina F. Keil
Introduction:
Initially, Tina was trained as a TV/Radio Technician. She is also an amateur radio enthusiast. This is where her love of new technology, hardware and building things comes from. In the 1990s, when the internet was on the rise, she worked as a web designer and later became self-employed as a web developer.
However, she has always had a keen interest in psychology, and currently works in research as a social psychologist, often involved in research projects to develop software or scripts.
Q1: What were the reasons that made you decide to build a NAS using Zimaboard?
A1:I was getting increasingly frustrated with my old QNAP NAS, which had served me well for the last number of years but greatly limited the software I could use or install on it. I wanted a server that would consume as little power as possible since my server typically runs 24/7.
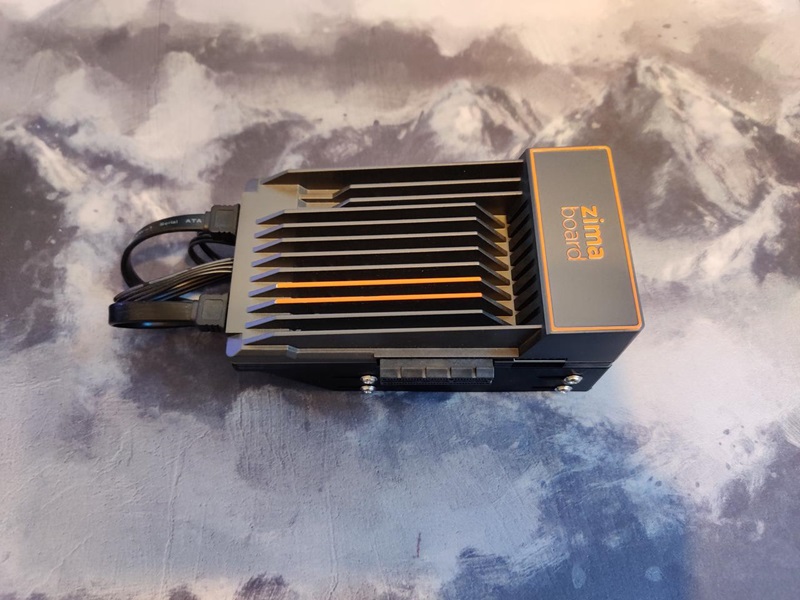
With electricity becoming more and more expensive, I wasn’t happy. I came across the Zimaboard by chance and was struck by its looks, small size, specifications, and low power consumption. However, I was most impressed by the fact that it is open to any operating system I chose to install. It fulfilled all my wishes: low power consumption and the freedom to use it as a NAS and a development server.
Q2: Could you walk us through the detailed process of building this DIY NAS?
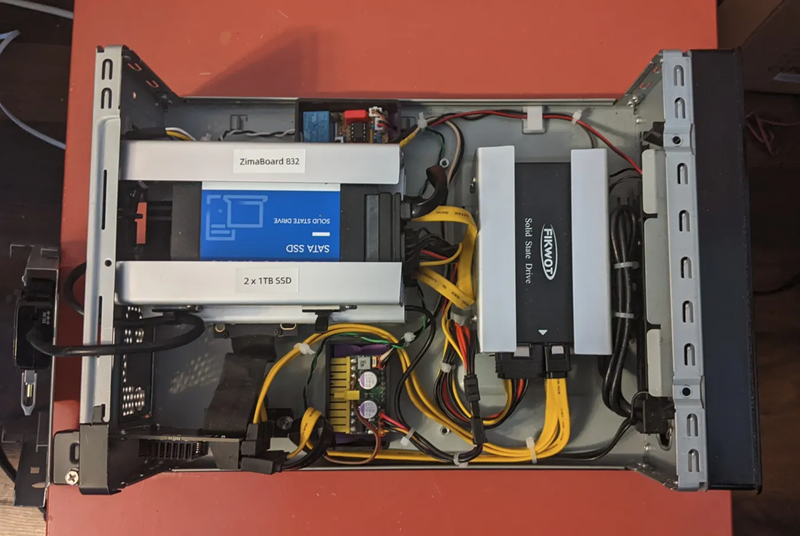
A2: The first part of building the Zimaboard NAS/Dev Server was deciding how to power everything. I chose SSDs over mechanical hard drives because of their size and because I knew their power consumption would be less (even if only minimally so).
Luckily, I had an spare picoPSU120 from an old server build, which I figured would be more than enough to power everything – nearly overkill. The advantage of using this over a conventional ATX power supply is that it’s tiny, does not need a fan, and is efficient and powerful enough.
The picoPSU needs 12V DC input and delivers 3.3V (not required), 5V and 12V DC output. I used a 90W (7.5A) no-name brick power supply to feed the picoPSU, figuring that 90W would be more than ample for my needs. I calculated generously that, at the most, I’d need about 40-50 Watts (on the presumption of 5 x SSD = 5 x 5W = 25W + Zimaboard, SATA controller, and USB hub = approx. 4-15W).
In reality, though, the whole setup needs much less, working out at around 9W when idle and about 14W when working.The only other thing I had to do was figure out how to mount the picoPSU in the housingcase that I was planning to use and also what I needed to do to switch it on. It turned out that switching on the picoPSU was easy.
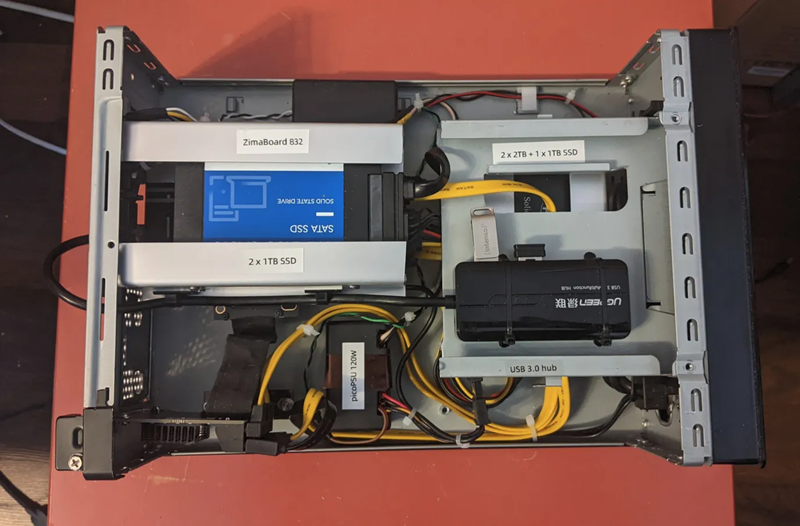
All that needed to be done was to connect Pin 14 to ground. I found a small plastic housing into which the picoPSU fitted perfectly and mounted this with two screws into the housing.The further process was relatively straightforward. I purchased the cheapest SATA controller (low profile) that I could find and five new SSDs (3 x 1 TB and 2 x 2TB, admittedly 5 x 2TB would have been better, but it isn’t in my budget at the moment).
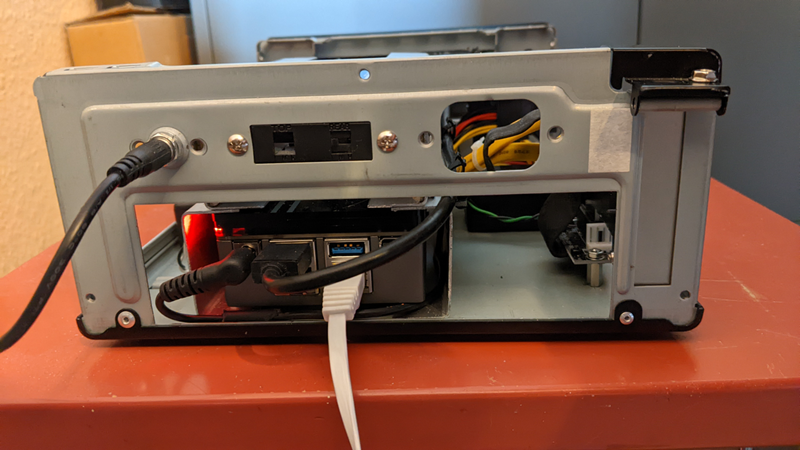
Because of the above periphery, I wanted the whole build in a suitable case to protect it from dust. I didn’t want to spend any more money and was lucky to find an old Antic housing I had lying around. Luckily, everything fitted quite nicely into the case. I made the frames that hold the Zimaboard and SSDs by cutting up an old aluminium U-sheet metal profile into suitable pieces.
Cutting them and drilling fitting holes was the most labour intensive work involved.My primary use for the NAS will be file storage/shares, combined with services needed for web development (e.g., MySQL, Nginx, etc.). Also, installing and using various other services like Backup Software, Cron Jobs, Plex, etc., is a nice-to-have option.
Q3: What technical challenges did you face during the building, and how did you manage to solve them?
A3: The most challenging things ended up being the case. The case had a push-button on/off switch and 2 x USB 2.0 connections on the front, which I thought would be neat to use.The problem with the switch was that I couldn’t use it as it was.
I needed a circuit that would turn on the picoPSU permanently once pressed and turn it off when pressed again. I found a simple Latch circuit with a 555 Timer and relay that would do the job perfectly. The parts only cost a few cents. I also mounted this in a small plastic case.
I would need at least 3 USB ports: one for Unraid (the OS I planned to use, which cannot be installed on a drive as it loads into memory via a USB stick), one for an external USB Drive (for occasional backups), and one for a second USB stick that I would use as a primary array drive (unused, but needed to set up a ZFS drive pool in Unraid for SSD TRIM support).
However, the Zimaboard only has two USB 3.0 ports. Using the old USB 2.0 connectors on the front of the case would mean degrading a good USB 3.0 port – which I didn’t like. The answer was to use a cheap USB 3.0 hub, which I also mounted in the case, leaving one USB 3.0 port on the Zimaboard free for my external USB drive.Power cable management was a bit tricky but doable.
Apart from that, it was a very enjoyable project. Time will tell if performance lives up to my expectations. I’m getting the expected 100MB/s transfer speed via my 1GB Network and have an average power consumption of 9-15W, saving me 2/3 of the electricity costs I had for the QNAP. Moreover, I can install and play around software-wise as I wish. For me, that’s fun pure.
Q4: What expectations or suggestions do you have for the next generation of Zimaboard?
A4 :I think it’s always difficult to find the right balance between power consumption, performance, features, and affordability. The manufacturers of Zimaboard have found a good mix of all four.The only option I might want in the future is the possibility of adding more RAM, mainly when not purely used as a NAS.
Also, having the double SATA port cable as part of the standard sales package would be nice. Adding the aluminium hard disk stand plates currently being sold separately would round up a fantastic deal and make a great product even more attractive.Lastly, I will keep a close eye on the development of ZimaOS. It will be exciting if it supports ZFS one day.

Join OUR COMMUNITY to discuss with our Members:
Discord: zimaboard.com/discord