Featured Posts
![]() John Guan - Jul 30, 2023
John Guan - Jul 30, 2023
In today’s digital age, virtualization has become an essential technology for managing and optimizing computing resources. Whether it’s for home media centers, small business servers, or educational purposes, efficient virtualization can significantly enhance performance, flexibility, and resource utilization. Virtualization allows users to run multiple virtual machines (VMs) on a single physical server, enabling isolation, easy management, and the ability to run different operating systems simultaneously.

Part 1: What You Should Know about Proxmox Virtual Environment?
Proxmox Virtual Environment (Proxmox VE) is an open-source virtualization platform that brings together powerful virtualization technologies, including Kernel-based Virtual Machine (KVM) and Linux Containers (LXC). Proxmox VE provides a comprehensive solution for virtualization, allowing users to run multiple virtual machines (VMs) and containers on a single physical server. This makes it an excellent choice for home users, small businesses, and even larger enterprises seeking efficient and cost-effective virtualization solutions.
Proxmox VE is designed to simplify the management and deployment of VMs and containers. It offers a web-based user interface that streamlines various administrative tasks, making it accessible to both novice and experienced users alike. With Proxmox VE, users can create, configure, and monitor VMs and containers with ease, leading to increased productivity and resource optimization.
1. Exploring the Key Features and Advantages of Proxmox
KVM Virtualization: Proxmox VE leverages KVM for full virtualization, which allows users to run complete virtualized operating systems on their ZimaBoard SBC. KVM provides excellent performance and isolation, making it suitable for running resource-intensive workloads.
LXC Containers: Proxmox VE also utilizes Linux Containers (LXC) for lightweight virtualization. LXC allows for the efficient sharing of the host system’s resources among containers, resulting in lower overhead and faster startup times.
High Availability (HA): Proxmox VE offers built-in high availability features, allowing users to create highly reliable clusters. If a node in the cluster fails, HA automatically migrates VMs and containers to other healthy nodes, minimizing downtime and ensuring continuous service availability.
Backup and Restore: Proxmox VE provides easy-to-use backup and restore functionalities for VMs and containers. Users can schedule regular backups and quickly restore their virtual environments in case of data loss or system failure.
Live Migration: Proxmox VE supports live migration, enabling users to move running VMs and containers between different ZimaBoard SBCs in the cluster without interrupting service.
ZFS Integration: Proxmox VE supports the ZFS file system, a robust and advanced storage solution. ZFS provides data integrity, compression, and deduplication, making it an ideal choice for managing storage in virtualized environments.
2. Understanding ZimaBoard SBC’s Compatibility with Proxmox
ZimaBoard Single-Board Computers are well-suited for running Proxmox VE due to their high performance, energy efficiency, and compact form factor. ZimaBoard SBCs are equipped with powerful processors, sufficient memory, and multiple ports for networking and storage connectivity. These features make ZimaBoard SBCs capable of handling virtualization tasks with ease, even in resource-intensive scenarios.
Proxmox VE’s lightweight design ensures optimal resource utilization on ZimaBoard SBCs, making it an ideal virtualization platform for these compact devices. Additionally, Proxmox VE’s web-based user interface allows users to manage their virtual environments remotely, enabling easy access and configuration for users with diverse technical backgrounds.
The combination of Proxmox VE and ZimaBoard SBCs provides an efficient and cost-effective solution for virtualization needs, whether for personal projects, small business applications, or educational purposes.
Part 2. How to Preparing for Proxmox Installation?
1. Hardware Requirements for ZimaBoard SBC
Before setting up a Proxmox cluster with ZimaBoard Single-Board Computers (SBCs), it is essential to ensure that the hardware meets the requirements for smooth and efficient virtualization. The hardware specifications are crucial for creating a stable and performant cluster. Here are the recommended hardware requirements for each ZimaBoard SBC:
Processor: ZimaBoard SBCs come equipped with powerful ARM-based processors, which are capable of handling virtualization workloads. Depending on the number of VMs and containers you plan to run, you can choose a ZimaBoard with an appropriate processor. The more cores and higher clock speeds the processor has, the better performance you can expect from the Proxmox cluster.
Memory (RAM): Proxmox VE’s memory requirements depend on the number and size of VMs and containers. As a general guideline, allocate at least 4GB of RAM per ZimaBoard SBC for small to medium-sized setups. For more substantial virtualization workloads, consider using 8GB or more RAM per SBC.
Storage: ZimaBoard SBCs typically feature onboard eMMC storage or support for microSD cards. While eMMC storage offers better performance, microSD cards are cost-effective and widely available. Allocate sufficient storage space for the Proxmox OS installation and consider adding external storage for VM and container data.
Networking: Proxmox cluster nodes need to communicate with each other and the outside network. Ensure that each ZimaBoard SBC has a Gigabit Ethernet port for reliable and high-speed networking. If possible, use a dedicated network switch for the cluster nodes to avoid potential bottlenecks.

2. Downloading the Proxmox Installation Image
Proxmox VE is available as a downloadable installation image from the Proxmox website. To prepare for the Proxmox installation on ZimaBoard SBCs, follow these steps:
Visit the Proxmox VE website (https://www.proxmox.com/proxmox-ve) and navigate to the Downloads section.
Choose the appropriate installation image for the ARM architecture, which is suitable for ZimaBoard SBCs.
Download the Proxmox VE installation image to your computer. The image file typically comes in the .iso format.
4. Creating a Bootable USB Drive
To install Proxmox VE on each ZimaBoard SBC, you’ll need a bootable USB drive containing the Proxmox installation image. Here’s how to create a bootable USB drive:
Insert a USB flash drive into your computer’s USB port. Make sure the drive has sufficient capacity to hold the Proxmox VE installation image.
Download and install a suitable USB imaging tool, such as Rufus (for Windows) or Etcher (for macOS and Linux).
Open the USB imaging tool and select the Proxmox VE installation image (.iso) you downloaded earlier.
Choose the USB flash drive as the target for creating the bootable drive.
Click “Start” or “Flash” to begin the process of creating the bootable USB drive.
Once the process is complete, safely eject the USB flash drive from your computer.
Part 3:Detail Guide on Installing Proxmox on ZimaBoard SBC
With the bootable USB drive ready, you can proceed with the installation of Proxmox VE on each ZimaBoard SBC. Follow these steps:
1. Booting into Proxmox Installation Wizard
Insert the bootable USB drive into one of the ZimaBoard SBCs.
Connect a monitor, keyboard, and mouse to the ZimaBoard.
Power on the ZimaBoard SBC, and it will boot from the USB drive.
The Proxmox VE installation wizard will appear on the screen.
2. Step-by-Step Installation Guide and Best Practices
The Proxmox VE installation wizard will guide you through the installation process step by step. Here are the key steps and best practices to consider during the installation:
Language and Keyboard: Choose your preferred language and keyboard layout for the installation process.
Installation Source: Select the bootable USB drive containing the Proxmox VE installation image as the installation source.
Disk Partitioning: Proxmox VE will automatically partition the storage device for the installation. If you have specific partitioning requirements, you can choose manual partitioning.
Network Configuration: Configure the network settings for the Proxmox node. Provide an IP address, netmask, gateway, and DNS server to enable network connectivity.
Password Setup: Set a strong password for the root user. This password will be used to log in to the Proxmox web interface.
Confirm Installation: Review the installation settings and confirm the installation process.
Wait for the installation to complete, and the system will prompt you to remove the USB drive and boot the ZimaBoard SBC.
After removing the USB drive, the ZimaBoard SBC will restart, and the Proxmox VE operating system will be installed on the device. The system may prompt you to remove any installation media and press enter to continue.
Once the installation process is complete, the ZimaBoard SBC will display the login prompt. Enter the root username and the password you set during the installation.
Congratulations! You have successfully installed Proxmox VE on the ZimaBoard SBC. Now, it’s time to configure the initial settings and network setup.
3. Initial Configuration and Network Setup
Web Interface Access: Proxmox VE offers a powerful web-based interface to manage the virtualization environment. To access the web interface, open a web browser on your computer and enter the IP address you configured during the installation, followed by “:8006” (e.g., http://192.168.1.100:8006).
SSL Certificate: Proxmox VE uses a self-signed SSL certificate by default. While it’s functional, you may choose to install a trusted SSL certificate for enhanced security.
Log in to the web interface using the root username and password.
Datacenter Configuration: In the web interface, you’ll see the Datacenter section. It is recommended to rename the default Datacenter to a meaningful name for easy identification.
Storage Configuration: To use the storage devices connected to the ZimaBoard SBC, go to Datacenter > Storage > Add > Directory. Choose the storage type (e.g., Directory) and specify the path to the storage device connected to the ZimaBoard.
Network Configuration: Go to Datacenter > Network > Add > Linux Bridge. Enter a bridge name (e.g., vmbr0) and choose the network interface connected to the ZimaBoard SBC.
Firewall Setup: By default, Proxmox VE enables the firewall to restrict incoming traffic. If necessary, configure the firewall rules to allow access to specific ports.
Update and Upgrade: It is essential to keep the Proxmox VE installation up to date with the latest security patches and updates. Go to the Shell in the web interface and run the following commands:
Reboot the ZimaBoard SBC to apply any system updates.
Now that you have installed and configured Proxmox VE on the ZimaBoard SBC, you have taken the first step towards building a virtualization cluster.
Part 4. How to Creating a Proxmox Cluster with ZimaBoard SBC?
A Proxmox cluster is a group of Proxmox VE nodes that work together to provide a high-availability and distributed virtualization environment. The cluster shares resources and virtual machines across multiple nodes, allowing for increased scalability and redundancy.
To create a Proxmox cluster, you will need two or more ZimaBoard SBCs running Proxmox VE. The nodes in the cluster communicate with each other through a dedicated network interface, called the corosync network. It is recommended to have a dedicated network switch for the corosync network to avoid potential network congestion.
1. Adding Additional ZimaBoard SBC Nodes to the Cluster
To add additional ZimaBoard SBC nodes to the Proxmox cluster, follow these steps:
Install Proxmox VE on each additional ZimaBoard SBC following the same steps outlined in Section IV.
Configure the network settings for each node, ensuring that they are connected to the same corosync network.
On the first node (the one you previously installed and configured), go to Datacenter > Nodes > Add.
Enter the IP address of the new ZimaBoard SBC node and the root username and password to authenticate the connection.
Proxmox VE will automatically detect the new node and add it to the cluster.
Repeat the process for each additional ZimaBoard SBC node you want to add to the cluster.
2. Configuring Cluster Communication and Networking
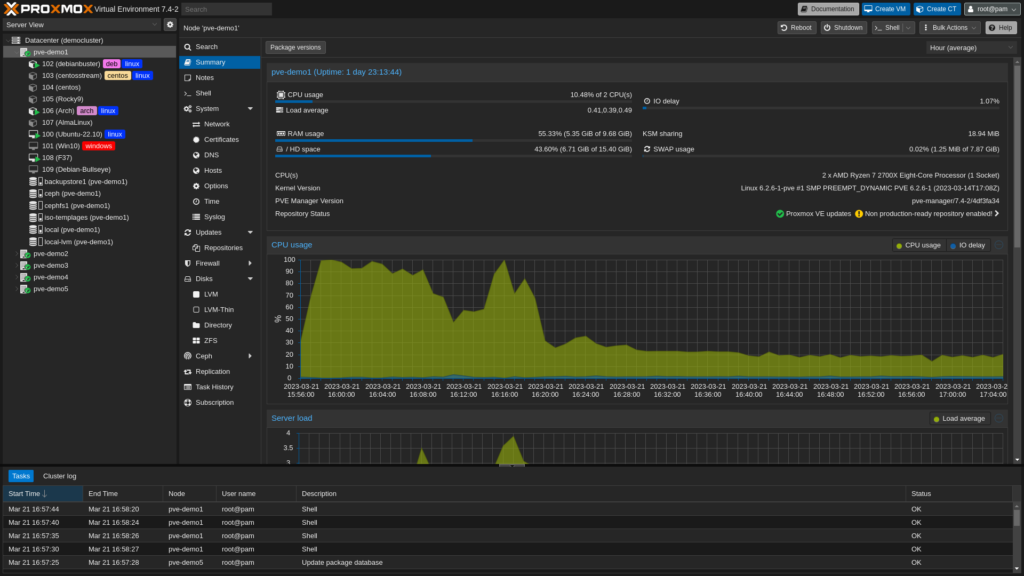
After adding all the nodes to the cluster, ensure that the cluster communication is functioning correctly. Go to Datacenter > Summary, and you should see all the nodes listed as members of the cluster.
To enhance the cluster’s resiliency, consider enabling the Proxmox HA (High Availability) feature, which ensures that virtual machines are automatically migrated to other nodes in the event of a node failure.
Configure shared storage for the cluster by adding a network-attached storage device (NAS) or SAN (Storage Area Network) that all nodes can access.
To ensure that virtual machines can communicate with each other across different nodes, make sure that the VM network is set to “vmbr0,” which corresponds to the Linux Bridge network interface you configured during the initial setup.
Conclusion:
Congratulations! You have successfully created a Proxmox cluster using ZimaBoard SBCs. With this setup, you now have a powerful and scalable virtualization environment that can handle various workloads and provide high availability for your applications and services.